Showit SEO – the Complete Guide on How to Easy SEO your Showit Website in 2025
~ Updated ~ January 30, 2025 ~
After launching many custom Showit website designs for my clients, I found that most questions that come up are regarding Showit SEO. I used to send a version of the below guide to my clients. However, I decided to make this guide publicly available, too. So, if you are looking for the most Complete Guide on How to SEO your Showit website you are at the right place.
Oh, and if you are not currently using Showit but are eager to find out more about the Showit platform, be sure to check my Showit Review article. The article contains information I gathered by using and designing for Showit’s platform for years. So make sure to check The Complete Showit Review – Pros and Cons You Need to Know. The first version of this article was first written back in 2020 but I constantly update all information with the latest Showit platform updates, improvements & features.
Back to the Showit SEO – Just read the below Showit SEO Guide, and please do let me know if any questions come up.
Table of Contents
- Is Showit Good for SEO?
- Do you need a Showit SEO Course?
- When to seek help from a Showit SEO Expert?
- Showit SEO Settings: How to do SEO on Showit
- How to optimize blog images for your WordPress-powered Showit blog
- Key Takeaway: Showit SEO
Is Showit Good for SEO?
Absolutely, yes! SEO for Showit is no different than any other platform out there. If you are asking if you could rank at position number one on Google with a Showit website – the answer is also yes! I got clients for whom I designed a custom Showit Website that rank number one for their targeted keywords. However, you must know the specifics of the platform and how to properly do Showit SEO.
If you are new to Showit or if you are wondering if Showit is the right platform for your website and would like to find out in-depth information about the pros and cons of Showit as a platform you can check my article about Showit review. Inside the article, you can read about the specifics of Showit as a platform and not only when it comes to SEO. If you’re looking for a complete review then that post is the only thing you will need.
Do you need a Showit SEO Course?
I will be totally open here.
You will most probably benefit from a Showit SEO Course. And, especially if you’re new to the platform or new to SEO. If you’re looking for a Showit SEO Course, my recommendation is to find one that not only provides the technical part of how to SEO Showit but one that teaches you at least the very basics of how to optimize your website for search engines.
However, if you want to learn on your own, and do Showit SEO by yourself this post covers everything you need to know to be able to properly SEO your Showit website (keyword research excluded). These are the very same settings that are recommended by the Showit team themselves. And, the very same ones I implement on absolutely every custom Showit website design for my clients here at the Flying Muse.
When to seek help from a Showit SEO Expert?
The most important thing to know is that SEO takes time, dedication, and persistence. You can absolutely SEO your Showit website by yourself if you learn and adopt the very best Showit and SEO practices. However, sometimes, you may not want to invest or have the time to learn Showit or SEO yourself. And, that is probably the right time to seek help from a Showit SEO expert.
However, if you are on the quest to do Showit SEO by yourself, just read this article to get all you need to know.
Showit SEO Settings: How to do SEO on Showit
Knowing where to add SEO settings to your Showit Website is super important. And, when you know the correct settings you need to insert in Showit it is extremely easy to SEO your Showit site.
1 | Showit SEO Page Options
To add Page SEO to your Showit website, you will need to navigate to the Site tab. The Showit’s Site tab is located on the left side of the screen. Then, just select the SEO settings tab from the very right side menu. This is where you will need to set Page Title, Meta Description, Meta Keywords, and a Share Image for your Showit Website or an inner Showit Page.
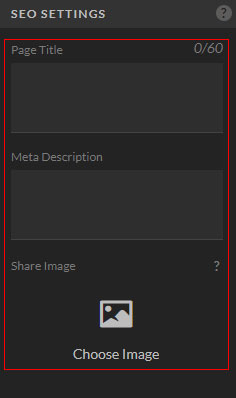
Step 1. Page Title
A Page Title should give an overview of what a Page is about to the reader. Search engines use the Page Title to display relevant results to searchers. Below are a few things you should take into consideration when crafting a Page Title for your Showit website and especially when it comes to Showit SEO.
What makes a good Page Title?
- Consistency is always a good thing. And, no different is a Page Title optimized for SEO. I recommend keeping your Page Titles consistent. However, it is not a good practice to make Page Titles identical, and you should avoid this at any cost.
- Keep Titles Short and on point. Your Page Title should be around 60 characters long but no longer than 70. Longer Titles are shortened by search engines. If your Page Title is longer than recommended any search engine will cut it off. A Page Title of the same length might get cut off in search results if you use Capital Letters instead of small letters in your Page Title, too.
- Test your Page Titles. You can always use a tool to help you test your Titles for Pages. One of these tools is the Moz tool. For Blog Posts, the feature comes built-in if you use the Yoast SEO plugin for your Showit WordPress Blog SEO. This feature usually comes with other WordPress plugins, too. However, keep in mind, if your intention is to use any other SEO plugin you will need the Advanced Showit subscription;
- Select Focus Keywords or Keyphrases for your Showit Pages. For any of your Showit site Pages, make sure to select Focus Keywords or Keyphrases relevant to your business. It is always a good practice to keep them at the beginning of the Title (for example – Branding, Showit & ProPhoto WordPress Website Designer | the Flying Muse). Keep in mind, that the keywords used should describe the content of the page and/or your business.
- Optimize your Blog Posts for SEO. When it comes to Blog Posts, make sure you use and utilize the Yoast SEO plugin. Alternatively, if you are on the Advanced Showit plan, my recommendation is the Rank Math plugin. I suggest that you use the Blog Post’s actual Title followed by your business name or website’s domain name (for example – Showit SEO – the Complete Guide on How to Easy SEO your Showit Website | the Flying Muse).
Step 2. Meta Description
The Meta Description shortly is called a Description, too. The Meta Description is a short page content description. The goal of the description is to grab attention and entice people to click on your Page or Post when displayed in search results. Below are some helpful tips to help you in writing a description for your Page(s) or Blog Post(s).
What makes a good Meta Description?
- Meta Description Length. Your Meta Description should be around 150 characters.
- Describe your Page as you would to a real person. Always write your descriptions in one paragraph and use real-life sentences. Don’t sound like a robot!
- Don’t include spammy keywords. A very good practice is to include your focus keywords or keyphrases as part of your description. This will also help you in ranking and will entice searchers to visit your page. However, don’t stuff your descriptions with keywords because that looks spammy!
- Make all of your Page or Blog Posts descriptions unique. Maximize your Showit SEO efforts for search engines to be able to recognize the uniqueness of each page on your website by writing different and unique descriptions for every Page or Blog Post Description.
Step 3. Meta Keywords
It’s super important here to set a differentiation between Meta Keywords and Focus Keywords or Keyphrases. Keywords in Showit are different than Focus Keywords/Keyphrases. If you are not new to SEO, you probably know that Focus keywords are very important for SEO. Google uses Focus keywords to analyze any site content. By doing so, Google knows when your Blog Post or a page is optimized for that Focus Keyword.
Adding Keywords in Showit’s SEO section will add meta keywords to your page. You might be surprised that this actually is useless. And, Google already stated they do not use meta keywords anymore as a ranking factor. In addition to this, some SEO experts say using them can harm your website’s ranking.
What does this mean for you?
When you are setting any of your Showit SEO settings, just make sure you keep the Keywords section empty.
Edit: Ever since Meta Keywords became so irrelevant, Showit has removed the option to add Meta Keywords from the Showit editor.
Step 4. Share Image
Share Image is the image that will display on social media when you share that Showit’s Page URL (address, link). Unlike WordPress websites, setting a Share image for pages created with the Showit editor is different than setting a Share image for your WordPress-powered blog posts. To set a shared image for any of your WordPress-powered blog posts you will need to set a Featured Image while editing your Blog post and via your WordPress dashboard.
PRO TIP: Make sure to tailor and fill in all of these details to fit your business before launching your website. It’s super important to know that you can come back to these settings at any time you need, and make changes and adjustments as you see fit.
If you purchase a Showit website template, you will notice – all SEO settings are empty. These settings are left out on purpose, so you can tailor them to your business and fill them by yourself. And, not to mention, no one can craft SEO settings for your business better than you!
2 | How to Organize Layers for your Showit Website and Impact on SEO
Unlike other platforms and since Showit is so specific, another thing to pay attention to is how layers are ordered or laid out.
Following the best Showit SEO practices, the layers should be ordered hierarchically and in the order, they appear on a screen from the top of the page. This is because all search engines (Google, too!) scan your website code for HTML code.
However, don’t get scared – this doesn’t mean you will need to do any coding at all! Showit made this super easy to do – by dragging and dropping your layers within Showit! How easy is that! Note: There might be some exceptions to this rule – some design elements need to appear above other elements.
If you purchased your design from a Showit website designer, all layers should already be organized properly and follow the Showit SEO recommendations. For any of the custom Showit website design projects and Showit website templates I work on here at the Flying Muse, I always implement this according to the Showit recommendations and requirements. If you are looking to purchase any of my Showit website templates, the proper layering is already handled for you!
Or if you are looking for a custom Showit website designer to work on your custom Showit website design project, make sure they have this covered within their custom Showit website design process – as I do! However, if you are designing your own website, be sure to pay attention to this when customizing and designing your website.
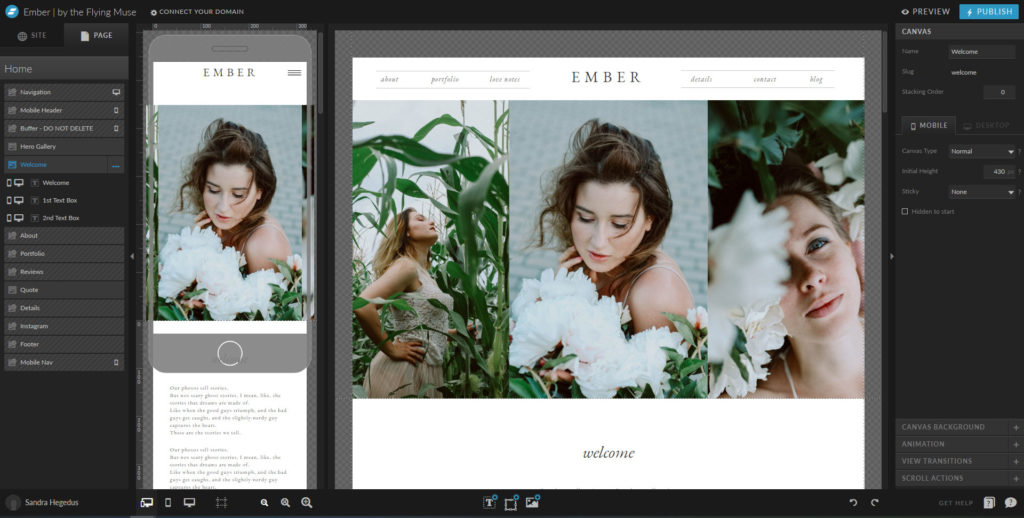
Displayed above: Showit Platform Design Interface (screenshot of my Ember Showit Website Template Design)
3 | How to Optimize your Showit Website HTML Text Tags for SEO
Showit will automatically apply HTML tags (h1, h2, h3, div, nav, p) to any text style you use on your website. Showit by default handles this for you to help in optimizing your Showit SEO. However, some manual settings need to be applied to give a boost to your SEO.
If you had ever used any SEO techniques before, you will get pleasantly surprised the Showit SEO settings you need to apply are not that different than for any other website. Below I have included an excerpt of the latest Showit SEO recommendations when it comes to optimizing your Showit Website HTML text tags for SEO.
- You should use ONE H1 HTML tag per page only. Add the H1 HTML tag to the heading that has the best information about your business and keywords on the entire page. Don’t forget to optimize your H1 heading HTML tag for search, too!
- All navigation text styles should be set to nav. If you are not sure what navigation text styles are – these are all of the clickable texts inside your navigation menu bar. It is especially important to set this correctly and according to the Showit SEO recommendations so that search engines know they are navigational items. Search engines can not see what’s on your website – they read the nav HTML tag instead so they can understand your website structure and page hierarchy.
- Use the text tag div for text styles that are primarily for design purposes. This HTML text tag should be added to none essential for SEO elements used on your page and ones that do not add any value to your SEO efforts, such as large numbers or letters;
- Your Headings should be ordered in a hierarchical order. This helps search engines understand your content better so they can display your pages for relevant keywords that are included on your page.
For every custom Showit website design I work on for my clients, I always implement the latest Showit SEO Website Recommendations not only when it comes to the HTML Tags. This is a part of my own signature website design process and is only one step on my Showit Website Launch Checklist.
4 | How To Optimize Your Showit SEO Website’s Images
No website SEO is fully complete without optimization of all of the graphics and images that are being used and uploaded to a website. No different is your Showit website.
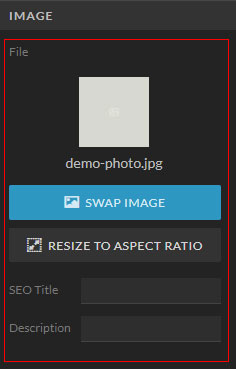
Step 1. Image file name
The best practice for naming your images is to give a descriptive file name.
One of the biggest mistakes is naming your images with generic file names or duplicating the very same keywords in the image file name. If you do so, you might get penalized for keyword stuffing. And, that means, all of your other SEO efforts might suffer, too.
Therefore, always make sure you are naming your images by giving context on what’s on that image. You may also add location info in the file name if that is of importance to your site visitors.
Step 2. Image size
For best performance, it is recommended to always upload images in the displayed size on a page. This refers to the actual physical size in px for any uploaded image on your website.
To make sure your images look crisp on high-quality displays, you’ll need to upload a photo that is double the size of the image container. This means, if your image container is 200×300 px you need to upload a 400×600 px image for crisp images.
Additionally, your website imagery and graphics should not exceed 500KB (but closer to 300KB is way better).
What to do if you had already used bigger image files on your Showit website?
For every custom Showit website design I work on for my clients, I always replace images with the correct size (as the in-use ones) when a website design is accepted by the client and deemed final. This is a part of my own signature website design process and is only one step that is on my Showit Website Launch Checklist.
So, if you had already used an image bigger (or smaller) than the one being used on any of your Showit pages, just upload a new optimized one and replace the current one. However, this is only one step of the process of optimizing your Showit site images. To get the maximum for your Showit SEO make sure you do not miss any of the steps below.
Step 3. Image Compression
Showit does the heavy lifting of compressing your images. However, to boost your Showit Website speed and to make sure your Showit site is optimized for best performance it is absolutely important to compress your images before uploading them to your Showit website.
Step 4. Set SEO Image Title
Within Showit there is an option for you to add a Title to each image that is being used on your website. The Title is typically used for display purposes within search engine results for a specific query. In addition to this, when it comes to SEO, Titles are not as important as the image’s description and alt text.
Recently Titles are used for visually impaired people to be able to recognize what’s on that image. So, just go and set Image Titles for all of the images that are used on your website pages. Accessibility is getting even more important, so make sure you fill this information in so it can be used by screen readers. If you’re interested in learning more about accessibility and image use here is an article on image accessibility by Yale University.
Make sure to make your titles short, simple, easy to understand, and descriptive of the image. And, don’t forget! Each image on your website should always have a different title.
Step 5. Set Image Description & ALT
The description setting within Showit will act as the image’s alt text. The description/alt text is important for three reasons:
- Website visitors who are visually impaired will get context to what’s in the image or what the image is about;
- Sometimes it may happen for some reason your image may fail to load. In such a case the alt text will appear to describe what’s on your image;
- By setting this Google and other search engines will be able to crawl your website for related keyword content. Google can’t see what’s on your image. So, instead, Google reads the description to get the contextual information.
Shortly, with your description, you should describe/give a context of the image in plain language. However, you should avoid keyword stuffing, as this will most probably get your website penalized. Ideally, each image on your website should have a different description.
How to optimize blog images for your WordPress-powered Showit blog
If you had a WordPress website before, you will find the above details on how to optimize blog images for your WordPress-powered Showit blog sufficient.
Naming your image file names, Image sizing, Image Compression, Setting Image Titles, Image Descriptions, and ALT are what you need to set for any of your blog post images, too. The only difference between the Showit editor and the Showit WordPress blog is the place where you need to upload your images and the input fields where you need to enter the information.
Have in mind that Showit blogs are powered by WordPress. So, if you had written a blog post on WordPress before, there are no changes on how to do these things on Showit’s WordPress-powered blog, too.
Key Takeaway: Showit SEO
Wheh! You came to the very end of this guide on how to do Showit SEO on your Showit website! I know there are plenty of details to come back to!
How to do SEO on Showit might look intimidating and not as easy as you thought it would be. However, it just takes some time to get accustomed to the specifics of Showit as a platform. And, then implement the very best practices when it comes to SEO in addition to the Showit SEO settings as recommended by the Showit team.
You can definitely SEO Showit by yourself – you might just need some time to dedicate to this. And, if not, you can always outsource Showit SEO and find a Showit SEO expert to implement this or even a Showit Virtual Assistant or a Showit Designer / Developer to review if your SEO settings in Showit are implemented correctly and optimized for Search Engines.
Oh, and if you are looking for a Showit website designer to work on a new custom Showit website design, please feel free to get in touch! I always implement the recommended SEO settings and Showit SEO practices to all of the custom Showit website design projects I work on!
save + share this post
~ About the Author ~

Sandra | the Flying Muse
Sandra is the founder and lead designer of the Flying Muse, a boutique artisan creative studio handcrafting timeless brands and websites for photographers and creative entrepreneurs.
