Some of the clients I had worked with on custom Showit, ProPhoto and WordPress website design projects needed a piece of information on how to add a Facebook Pixel on their WordPress, ProPhoto, Showit blogs, or websites and WooCommerce or Shopify shops.
Considering that I had set a Facebook pixel on my own website and that it is especially important when it comes to my WordPress, ProPhoto and Showit templates shop it wasn’t that difficult to gather and compile a guide on the Facebook pixel.
I used to send all of this information to my clients by email only. I had explained many times what Facebook pixel is, how does it work, and how to set it up on your website no matter if one runs a WordPress, Showit, ProPhoto website, or blog, or you maintain a WooCommerce or Shopify store.
You will find all of this information below. So, read on 🙂
Table of Contents
- What is a Facebook pixel?
- Why do you need the Facebook pixel?
- How much does the Facebook pixel cost?
- What do I need to set Facebook Pixel up?
- Facebook Pixel Setup
- Key Takeaway: Setting up Facebook Pixel on your Showit, ProPhoto, Shopify, WordPress, WooCommerce website
What is a Facebook pixel?
Facebook Pixel is a code that you implement on your website, by placing it into the header section on your website.
This code enables Facebook to capture and receive information about the actions taken by your audience.
The Facebook pixel works by placing cookies. These cookies track users as they interact with your content – blog posts, pages, shops, products, etc.
Why do you need the Facebook pixel?
The Facebook Pixel tracks and collects data that helps you in optimizing your ads, building target audiences as well as remarketing to people who have already taken some action on your website.
It provides the necessary data so you can make your Facebook ads more relevant to your audience. With the data, Facebook Pixel gathers from the actions taken you will be able to not only measure the effectiveness of your Advertising campaigns but to make sure your ads are displayed to the right people.
If you’re considering making your Facebook ads as relevant as much as possible to your audience as well as sensitive to your budget, you definitely must implement the Facebook Pixel.
This feature will not only give you the necessary data to target your audience but will give you a tool to optimize your ads. If properly set, this will help you in optimizing your budget so you get more for the same amount spent on Facebook ads, too.
How much does the Facebook pixel cost?
This question is one of the most common questions that comes up when one learns about the added benefits of implementing a Facebook pixel on their website, blog, or shop.
Facebook Pixel is completely free to set up and implement on a website. However, while setting it up is 100% free, the main purpose is to help you in targeting and creating Facebook ads.
If you feel you’re not ready yet to pay for Facebook ads, you may want to consider alternative ways for targeting your audience without paying for Facebook ads. If so, you can check a guide I recently wrote on Simple ways to increase Facebook Page Reach without paying for Facebook Ads.
What do I need to set Facebook Pixel up?
Before you begin, make sure you have a website for your business that you can update code for. If you came to this post searching for information on WordPress, Showit, ProPhoto, WooCommerce, or Shopify this is absolutely possible. If your website is up and running you’re ready for the next step.
In addition to this, you will need a Facebook Business page set as well as access to the Facebook Business Manager tool.
Facebook Pixel Setup
Setting up a Facebook Pixel no matter if your intention is to implement it on your WordPress, ProPhoto, Showit website or blog, and WooCommerce or Shopify shop is fairly simple.
Although it may seem intimidating at first, and depending on your chosen platform there are several steps you will need to do setting up a Facebook Pixel is an easy and seamless process if you follow the steps below.
1 | Create and Get Facebook Pixel code
No matter what your website or shop platform is, creating the code takes place inside the Facebook Business Manager.
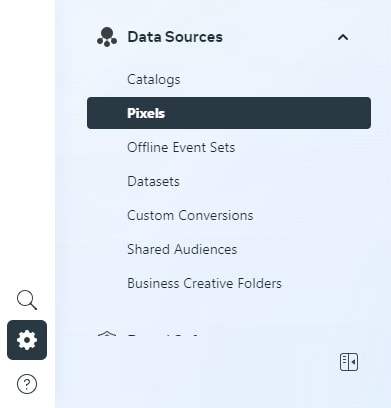
Step 1. After you had successfully logged into your Facebook Business Manager you will need to click on the Settings cog located at the very left side bottom of your screen. Next, navigate to Data Sources > Pixels.
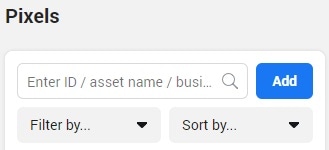
Step 2. Click on the Add New Data Source button and then on Facebook Pixel.
Step 3. Add your Pixel Name and your website address (URL) and click on Continue.
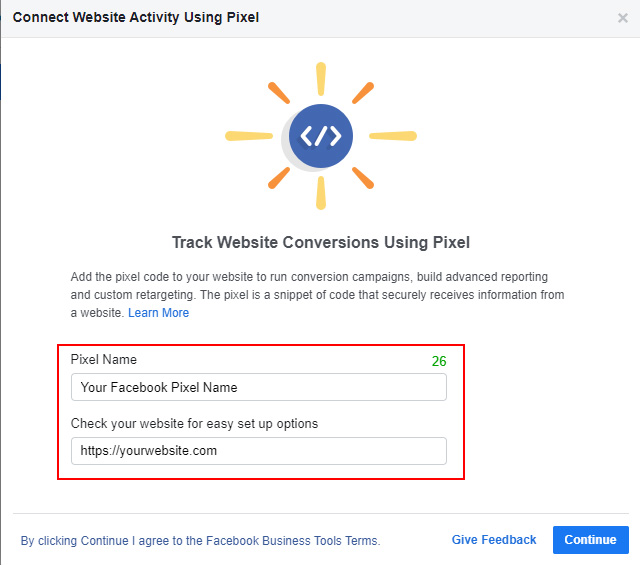
PRO TIP: Make sure to check if your website has an SSL implemented. You don’t want to misconfigure the website address URL (if it is https:// or http://). It’s best if you open up your website’s Homepage in a new window and grab the URL straight from the browser.
2 | Add & Install Facebook Pixel code
You just successfully completed creating your own Facebook pixel. Now you can proceed to add and set the code up on your website, blog, or shop.
If you had created your Facebook Pixel for the first time, Facebook will display a pop-up window with options to choose how to add the code.
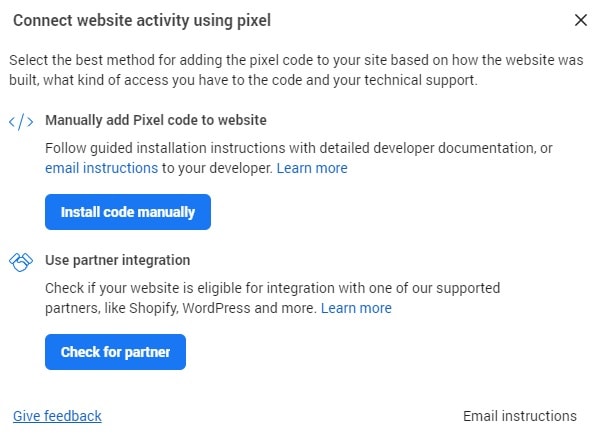
For ProPhoto and Showit. Now go and grab your code by clicking on the ‘Manually add the pixel to website’ and store that code in a safe location. I usually just copy-paste a code inside a Notepad editor. You don’t want to keep it inside Word or other WYSIWYG editors as that may add special characters and mess up the code.
For WordPress, WooCommerce & Shopify. You will need the Facebook Pixel ID instead. Make sure you copy that code and have it handy.
PRO TIP: Make sure to Toggle ‘Automatic Advanced Matching’ so you can track visitor-specific data, such as Gender, City, State, Zipcode, etc. According to Facebook, this information is going to be encoded to preserve visitor privacy.
Next to do is to set the Facebook pixel depending on your website, blog, or shop platform. I included details on each platform (I had worked with), so you can jump to the section that explains how to add the Facebook pixel code for your specific platform.
2.0 | Where to find an existing Facebook Pixel code
Facebook made it really hard to find an existing Facebook Pixel code. They buried it so much making it a real hassle to find it. If your code was previously set you will need to navigate to the Facebook Business Manager and go to Settings > Data Sources > Pixels > Open in Event Manager. There is a button located on the right side called Manage Integrations.
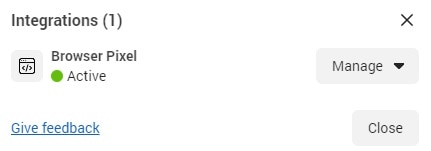
Click that button and a pop-up window will appear with information on Integrations.

Navigate to Manage > Add to another website. A new pop-up will appear from where you can choose your integration. If your platform requires the code to get inserted manually just click on the Install code manually button to grab the Facebook Pixel code.
2.1 | How to install Facebook Pixel on WordPress & WooCommerce
If you are running your website, blog, or shop with WordPress and/or WooCommerce you’re probably wondering where to add the WordPress & WooCommerce Facebook pixel code.
For native WordPress websites, blogs, and WooCommerce shops I used the Remarketable plugin from the WordPress plugin repository.
Read on below on how easy is to set up the Facebook Pixel on any WordPress website.
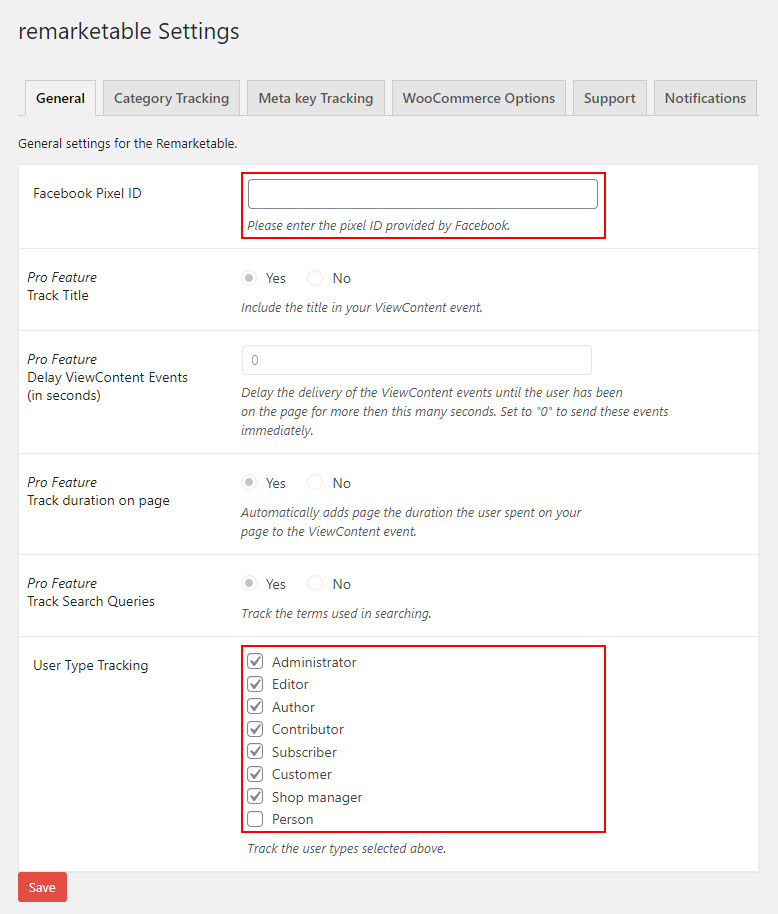
Setting Facebook Pixel is extremely simple. Just go, install, and activate the plugin. Then navigate to ‘Settings > Remarketable‘
You will need your Facebook Pixel ID to insert it into the WordPress plugin settings. If you haven’t already done so, to obtain your ID go to your Facebook Business Manager and Navigate to Settings > Data Sources > Pixels. This is the location where you can see your Facebook Pixel name listed and underneath the name is the Facebook ID. Just grab the code from there.
Insert your Facebook Pixel ID into the field and select the user type tracking you’d like to capture with the Facebook Pixel. Save all settings when you’re done. This makes the pixel set not only for a simple website or blog but for your WooCommerce shop, too.
However, there are WooCommerce-specific settings inside the plugin WooCommerce options Tab. So, you may want to fine-tune these settings according to your specific needs and preferences.
2.2 | How to install Facebook Pixel on ProPhoto
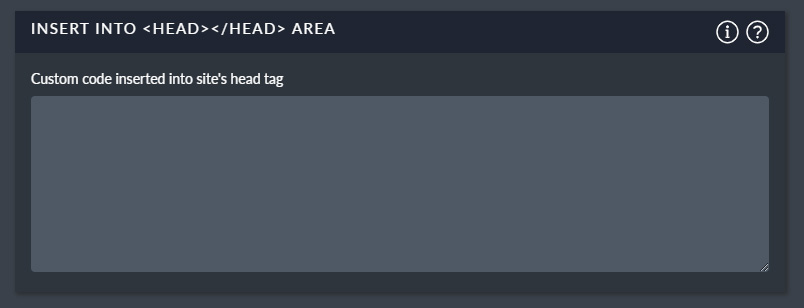
The complete code for a manual insertion you had generated and grabbed needs to be inserted in only one place inside the ProPhoto Settings. Navigate to ProPhoto > Settings > Advanced > Custom Code from inside your WordPress dashboard. Locate the Insert into the Head area and paste your code. Click on Save and you’re done.
PRO TIP: Make sure you had inserted the complete code here, not the Facebook ID only. That will most probably trigger an error on your ProPhoto website.
2.3 | How to install Facebook Pixel on Showit
As you might already know, Showit as a platform has its very own specifics on how things are set and customized. However, if you are not currently using Showit and you are here to get to know how this is done on Showit, be sure to check on the Complete Showit Review post I wrote a while ago. If you are here just to see how to insert your Facebook Pixel into an existing Showit website, read on.
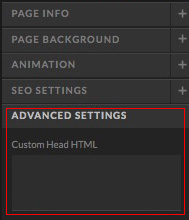
The Facebook Pixel code needs to go inside the Head section. Therefore, you will need to manually copy and paste the Facebook Pixel code inside the designated area. Navigate to each page in your Showit app and paste the manual insertion code inside the Page Advanced Settings Section and inside the Custom Head HTML input field. Don’t forget to repeat for every page you’d like to be tracked with your Facebook Pixel!
PRO TIP:
- Make sure you had inserted the complete code here, not the Facebook ID only. That will most probably trigger an error on your Showit website.
- Setting any Custom HTML on Showit must be done for each page. Therefore, you will need to repeat this process to add the code on each page separately.
- If you happen to have any other (additional) code in this area just add the Facebook pixel code beneath the existing code. They can work together and you can insert additional HTML Head code if you need one at any later point. The pixel code is set only once for each template on your WordPress Showit blog. This means you will need to add the code to each Showit blog template page.
2.4 | How to install Facebook Pixel on Shopify
To set the Facebook Pixel for your Shopify Store, you will need to navigate from your Shopify admin to Online Store > Preferences.
You will need your Facebook Pixel ID to insert it into the Shopify settings. To obtain your ID go to your Facebook Business Manager and Navigate to Settings > Data Sources > Pixels. This is the location where you can see your Facebook Pixel name listed and underneath the name is the Facebook ID. Just grab the code from there.
In the Facebook Pixel section, add your Facebook Pixel ID. Just click on Save and you’re set and ready to go.

Key Takeaway: Setting up Facebook Pixel on your Showit, ProPhoto, Shopify, WordPress, WooCommerce website
I really hope that this blog post has helped you in setting the Facebook Pixel, and you can now concentrate on advertising your brand, blog, shop, or website.
If this post has helped you, please don’t forget to bookmark it and share it on social media.
