ProPhoto is an amazing platform with many features implemented into the ProPhoto 7 theme. No different are the ProPhoto 7 forms that provide a vast majority of options to customize and implement almost any type of input field you need to.
Most of the time ProPhoto 7 website owners do not feel the need to add any additional plugins or features at all, and no different is when it comes to the forms module that is included in the ProPhoto 7 theme.
However, while working on Premium ProPhoto 7 theme designs and especially custom ProPhoto 7 website design projects I found out that a very small portion of my clients felt the need to implement a lead capture form, from an external platform (i.e. 17hats, Dubsado, etc.).
Table of Contents
- What are ProPhoto forms?
- How to know which forms to use? A Built-in ProPhoto Lead Capture form or an External one?
- How to add a ProPhoto form to your website?
- How to work with ProPhoto forms?
- How do ProPhoto form submissions work?
- How to embed a ProPhoto form from an external platform?
- What to do if you need extra help?
What are ProPhoto forms?
ProPhoto forms are no different from any other forms.
The ProPhoto form module gives you an option to provide your website visitors with a way to send you a message through your website.
By implementing a Lead capture form in your ProPhoto 7 website your leads will have the possibility to send you a message by using nothing more than their browser.
And even if a visitor landed on your ProPhoto lead capture form using a different device (no matter their screen size), they still will be able to send you the details and get in touch with you.
The most simple Lead capture form is a contact form. However, you can have a form with as many input fields as you need.
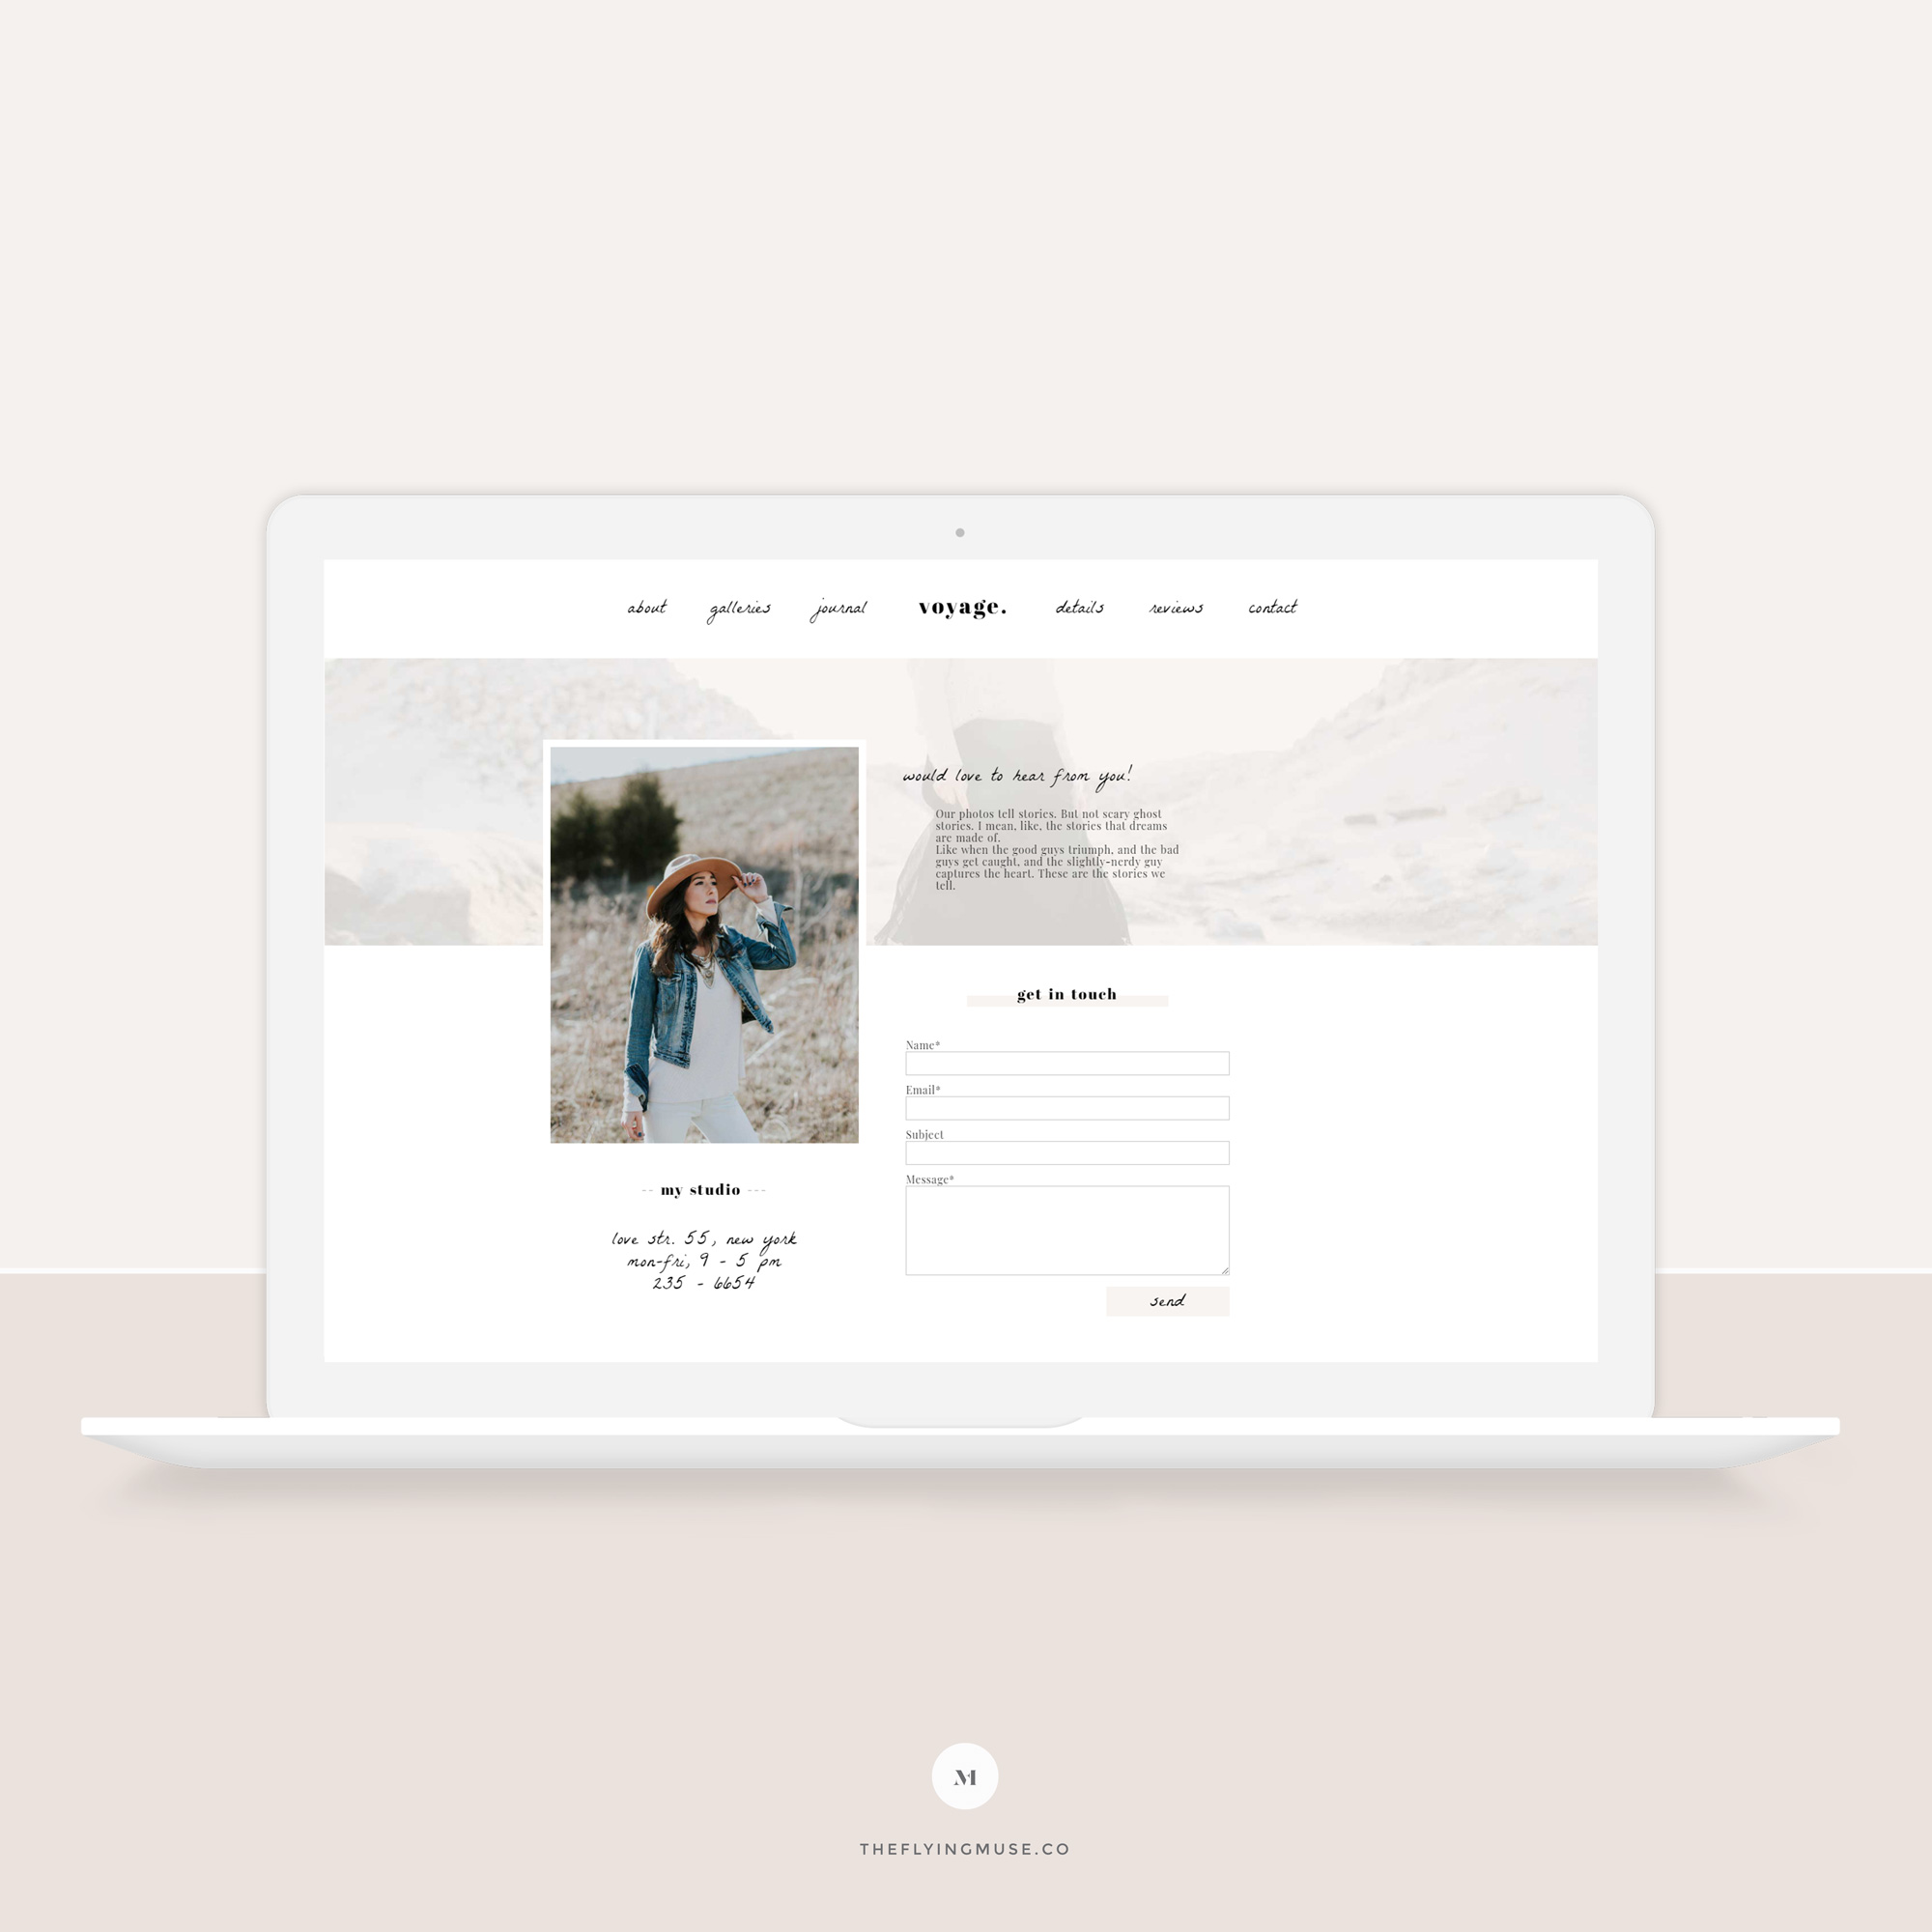
Example of a ProPhoto contact (lead) capture form from my Voyage ProPhoto 7 website template design.
How to know which forms to use? A Built-in ProPhoto Lead Capture form or an External one?
Most ProPhoto users find the forms module that comes with ProPhoto 7 sufficient for their needs.
As I earlier mentioned, nearly all of my custom ProPhoto clients use the built-in ProPhoto form module for their Lead Capture needs. And they are 100% happy with it!
However, the built-in ProPhoto form module does not include workflows and advanced features you will find in most CRM systems (or platforms) such as Dubsado, 17hats, etc. If you’re looking for a CRM for your Photography or Creative Business you can try Dubsado (and if you decide to stay with it you will get 20% off your first month or year if you create an account using my Dubsado link).
So, if you do need any special features other than a simple email notification and storage of your Lead Capture Form submissions you will need to find and select a CRM system that is suitable for your needs.
I mostly work with Photographers (I also work with some creative business owners) and almost all of them use any of the following: Dubsado, 17hats, or Tave.
How to add a ProPhoto form to your website?
Most of the designs that are available for ProPhoto 7, the free ones, the premium ProPhoto 7 templates from the ProPhoto store as well as the Flying Muse ProPhoto 7 templates (yes, my own designs 🙂 ) come with at least a simple contact form.
Even in case if you need any additional input fields, the Lead Capture forms that come with any of the ProPhoto 7 designs, are extremely easy to customize.
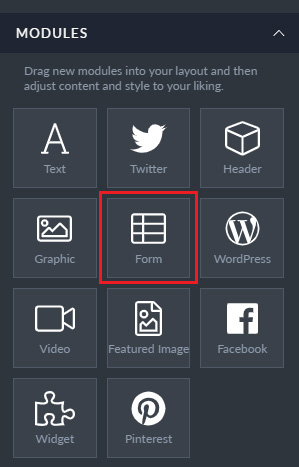
However, if you want to dive in and create your own Lead capture form, you can do so. Just go on the ProPhoto page where you want the form to be placed and drag the Form module inside a new or existing block.
How to work with ProPhoto forms?
If you are working with a ready-made ProPhoto design the form to customize is usually placed on the contact page.
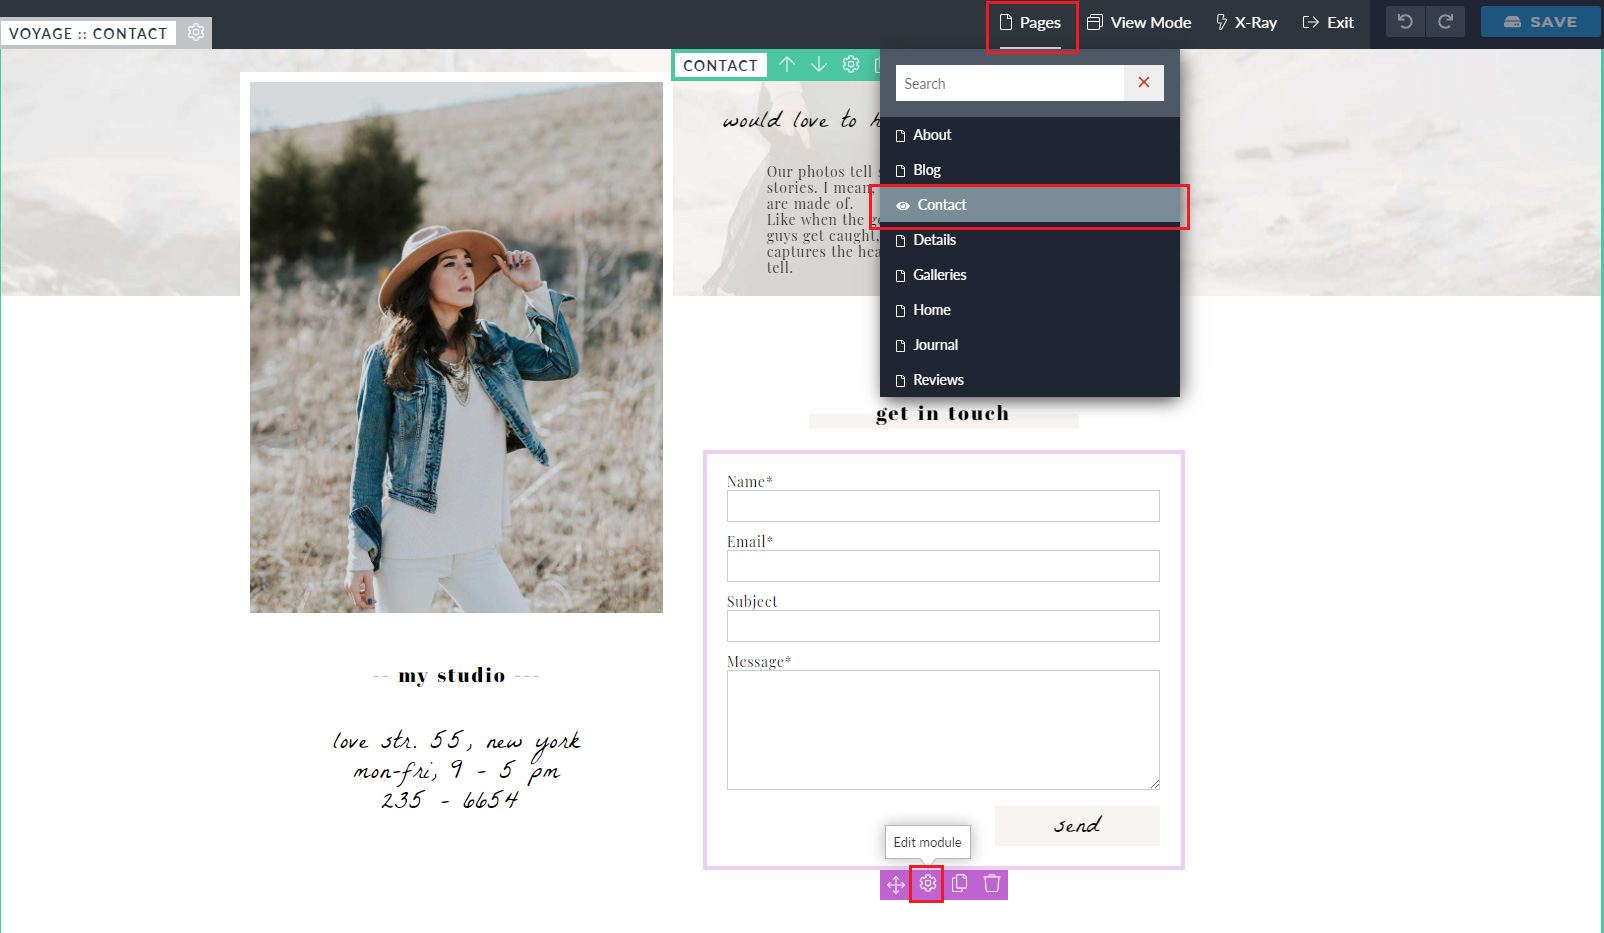
If so, to customize the Contact page and the form that comes with the design, navigate to the Pages > Contact inside the ProPhoto customizer.
Just click on the gear icon to access options to customize the contact form.
However, if you had placed your own form module on a different page (as I earlier mentioned) you will see the very same pop-up as if you had clicked on the gear button.
You can add, remove, or change any fields.
ProPhoto makes use of your WordPress e-mail address to send form entry e-mail notifications. If you’d like to receive notifications to a different e-mail address, navigate to your WordPress dashboard and just go to ProPhoto > Settings > Forms and enter an e-mail address into the Email options field.
For an in-depth tutorial on how to work with the form module make sure you check the awesome ProPhoto 7 Forms guide that the guys at ProPhoto compiled.
How do ProPhoto form submissions work?
ProPhoto form submissions work as standard form plugins that most WordPress websites use. However, there are some additional features that make ProPhoto forms extra special!
Let’s focus on the process first, and then I will get to the extra special feature I am almost 100% you will love about the ProPhoto 7 Lead Capture forms.
The process to send a message to you using the ProPhoto Lead Capture form on your website is fairly simple. A visitor should only add information to the fields you have provided.
All they need to do to push the message to you is to click (or press) the Submit button. How simple is that? 🙂
After successful submission, a message will get displayed on the visitor screen informing them that the message has been sent to you. This message can be customized in ProPhoto settings.
After this, the message should (without any issues at all) land in your inbox.
And here we come to the most awesome feature that ProPhoto forms come with – the ProPhoto Form Log!
The awesome team at ProPhoto planned and implemented an awesome feature, storing your Lead capture forms submissions in one safe place – your WordPress dashboard. So, even if you accidentally delete the message or due to some spam filters a message never reached your inbox, you can log into your WordPress dashboard and check the messages out. Your messages are never lost!
Note: if anyone claims they had submitted a form via your website and you do not see the message inside the ProPhoto Form Log, most probably the person who wanted to submit the message never did.
How to embed a ProPhoto form from an external platform?
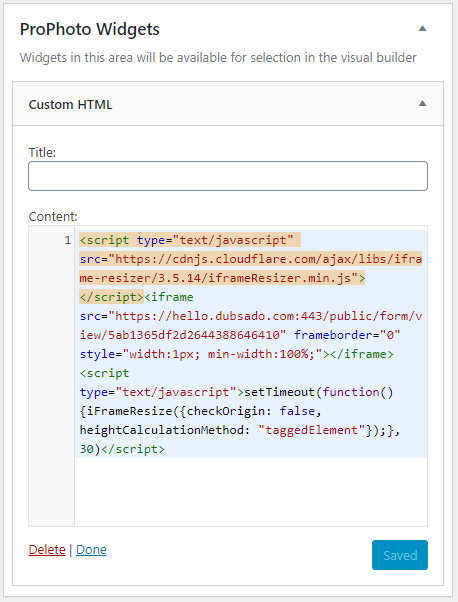
Step 1. Go to your WordPress dashboard and access your WordPress widgets via the Appearance > Widgets menu. Create a new Custom HTML widget, drag and drop it into the ProPhoto widgets area, and paste your embeddable form code.
Below is an example for a Dubsado form, but you can embed almost any other form, including but not limited to any other CRM or email marketing platforms such as Mailchimp, Mailerlite, or others.
Step 2. Navigate to the Page where you want to display your Lead Capture Form (from an external platform) and click on the Customize button.
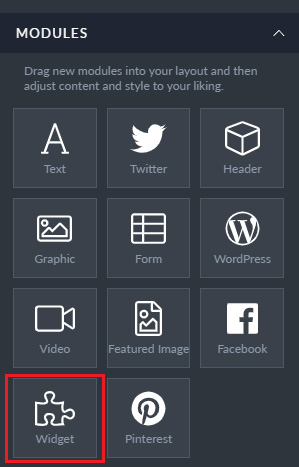
Step 3. Place a Widget Module by dragging and dropping inside a ProPhoto block. If you do not have a ready-to-go Block you can create a new one, too.
Step 4. A pop-up will display and prompt you to select the widget. Select the Widget you just created.
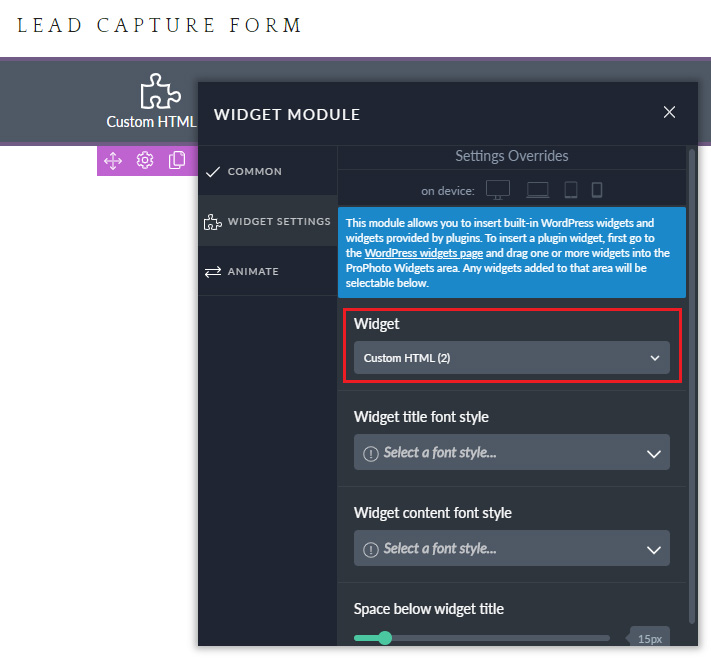
Step 5. Your Lead Capture Form is placed and ready to go. Do not get worried if the form does not display inside the ProPhoto customizer. Just push the Save button and you are ready to go! 🙂
Step 6. Preview the Lead Capture Form on your live website. It is that easy! 🙂
What to do if you need extra help?
From my own experience if you decided to go with ProPhoto and you ever feel you’re stuck the lovely team at ProPhoto support will make your life way, way easier.
If you struggle to get something to work (the way you wanted) they are always happy to give a helping hand and even provide helpful resources and answers to specific questions inside the ProPhoto Community Facebook group.
Even if someone from the team doesn’t reply to you inside the ProPhoto User Facebook Community there will most probably be another ProPhoto user that will chime in and share the experience with you.
Or if you’re up to you’re always welcome to join my Facebook Community Group and ask away anything Branding, Website, and Marketing related. Just join, don’t be shy, and introduce yourself 🙂

